 Hiked Sunday, March 24.
The forecast for today called for rain all day, yet when I got out of bed, the sky definitely did not look like rain. I spent an hour or so getting ready, keeping an eye out, before deciding for sure that the weather would hold off long enough to allow me a short hike. Didn't settle on a destination until after I left, though. I kept looking at the clouds, trying to decide where it was darker and where it was lighter, and which way the clouds were moving. Finally settled on Shoemaker Canyon.
 I've done Shoemaker Canyon twice before: On November 19, 2010, and December 27, 2010. That means it's been about 15 months since my last visit.
The normal route would be to take the Foothill Freeway (I-210) to Azusa Avenue (CA-39) and head north. Azusa becomes one way (north bound) at the freeway, with southbound coming down on as N. San Gabriel Ave (not to be confused with San Gabriel Blvd, which is far, far, far to the west of San Gabriel Ave). You'll drive through downtown Azusa, which looks very small town-like, despite the new Target in the middle. On Sunday morning, the low morning light made downtown Azusa look like someplace much further away from Los Angeles.
 After leaving downtown, you pass through some residential areas before the north and southbound lanes come back within sight of each other. That's just after the Stop and Go convenience store (where you could buy an Adventure Pass, if you didn't already have one). There's also the San Gabriel Canyon Gateway visitor center, just a mile or less past the Stop and Go, and on your right. You could not only buy an Adventure Pass there, but you could also get your Wilderness Permit (if the Center is open)
As you drive up Azusa Canyon, you'll notice a bike path on your left. You could ride that all the way down to Long Beach, if time and stamina permit.
 About 12 miles north of the Foothill Freeway, after passing two dams and two reservoirs (the water in both was lower than I've seen it in quite some time), a bridge will come in from the right. That's East Fork Road, which you want to take.
Head up East Fork Road about three miles, and keep an eye out for the left turn to Shoemaker Canyon. There's a left turn lane for you to use.
1.8 miles later, you'll reach a locked gate, with a parking lot on your right. Park there.
From the gate and parking area, you can look down on the East Fork trailhead far below. That's where you'd start the hike to either Heaton Saddle/Iron Mountain or to the Bridge to Nowhere.
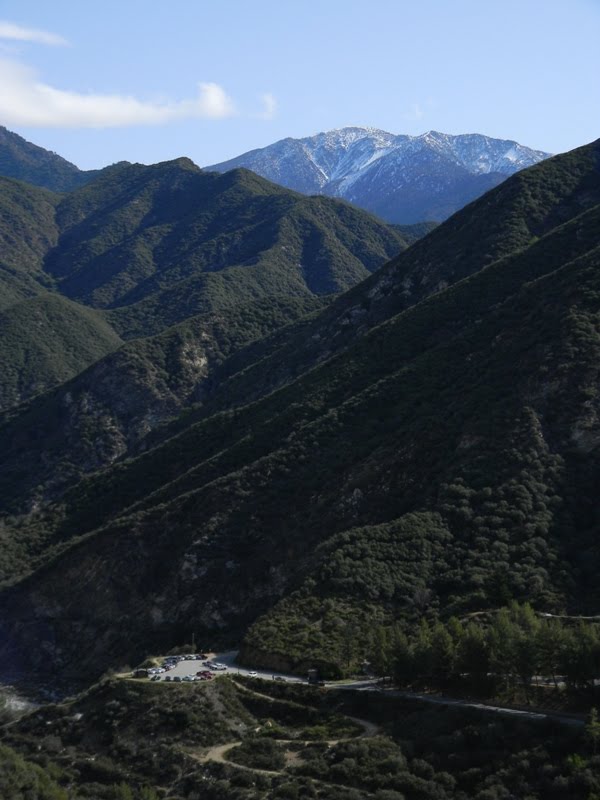
 Despite the forecast, it was crisp but clear as I started my hike. Looking across the canyon, you can see a nice series of foliage-covered hills. Looking upstream, massive Iron Mountain dominates the view. Taller but further away, and partially obscured by intervening ridges, is Mt Baldy (Mount San Antonio). It can be impressively clad in snow in winter, though it has been mostly bald this winter. Some snow, but nothing compared to what I saw the last time I hiked this trail.
 Your hike begins by walking around the gate and heading along a wide, heavily-engineered dirt road. There are mile markers just on the other side of the gate indicating 1.89 miles. Several other mile markers are along the way, all looking very shiny and reflective. I think they must have been added in the last year or so, and I'm assuming their mileage is accurate. If so, the distance for this hike is somewhat longer than indicated on the Tom Harrison "Angeles High Country Trail Map." His map says it.s 2.2 miles from the gate to the mouth of the second tunnel.
 By contrast, a mile marker just past the first tunnel says 4.4, indicating it's 2.5 miles just to there. There are no mile markers after the ones at 4.4, but it's at least 1/2 mile from there through the second tunnel, making it 3 miles each way, or 6 miles roundtrip. It's possible to add an indefinite amount of walking, either by continuing on the rough trail that extends past the second tunnel, or by taking a cross-country route out of Shoemaker Canyon along one of the side canyons. Neither would be easy or pleasant, unless you're willing to get scratched or if you're wearing proper clothing.
 Mile markers seem to be placed in most "coves," probably to help maintenance crews locate pipes or other things that must be monitored. When I got to the 4.4 mile marker, I heard a quiet trickle coming from the cove, so I walked about fifty yards to the left to see if there'd be a waterfall in this way. The small trickle I saw did not really qualify as a waterfall.
 I went back to the trail and continued through the second tunnel, then returned via the "outside" trail that goes along the outside of the hill that the tunnel goes through. This gives you a better view of the canyon below. It's a steep and rugged canyon. However, it looked like there was an orange tie where someone took a trail down to the river. Not sure if they needed any technical assistance to make it to the water.
When I got back to the first tunnel, I also took a short side trail to the top of the stone wall that tops the entrance.
There were some Indian Paintbrush, and some small blue and purple flowers here. Meanwhile, the clouds that were building all day were turning pretty dark around Iron Mountain.
 Still, the rain held off until after I got back to my car. It was only after I got on the freeway that the drops began falling. Although it would pour later in the day, the first pulses of this storm were intermittent, so even if I had gotten caught in the rain, it wouldn't have been that horrible. Nonetheless, I purposely took a short hike on a wide trail so that if I needed to make a mad dash back to my car in the rain, I could. I could also have taken shelter in the tunnels if it looked like the rain would pass. Moot point, though, as the rain did wait until I was back in the car.


No comments:
Post a Comment